 United Kingdom (English)
A lambda sensor, or oxygen sensor, is a vital element in your car’s emissions systems, ensuring that your fuel mixture has the right amount of oxygen for efficient and environmentally-friendly combustion. In this blog post, we’re going to briefly look at what a lambda sensor is, how it works, when you should check it and how to replace it.
What is a lambda sensor?
The lambda sensor is located inside your exhaust manifold close to your engine, with cars equipped with EOBD II (European vehicles after 2001) also having a second sensor downstream each catalytic converter with the aim of measuring catalytic converter´s performance. The sensor measures the percentage of unburned oxygen to see if there is too much (the mixture is too lean) or too little (the mixture is too rich). The results are sent to the Electronic Engine Control Unit (ECU) so that the amount of fuel entering the engine can be adjusted for an optimum mixture. This is constantly changing depending on a number of factors, including the engine load (e.g. hills), acceleration, engine temperature and warm up period.
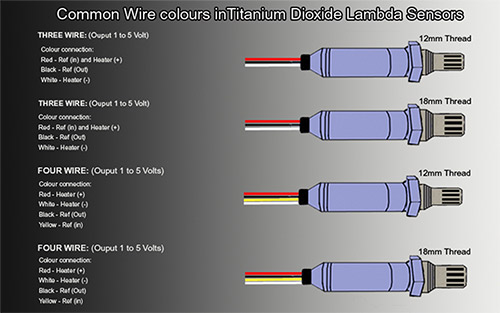
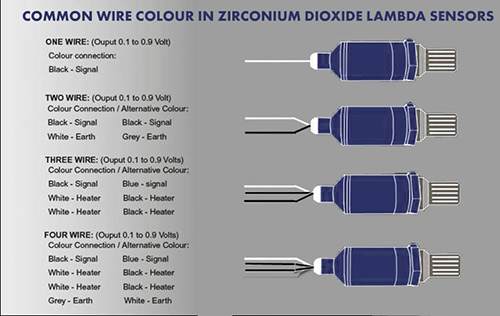
In the market there are three types of lambda sensors, the oldest ones and most common in the market are the zirconium oxide lambda sensors. This type exist in different configuration (one, two, three or four wires), depending if the sensor is preheated or not. The second type is the titanium oxide lambda sensor, also available in four different types (see the picture), this type is easy to identify because the diameter of the threat is smaller than the zirconium oxide (as a visual tip, these sensors have yellow and red wires). Finally the third type is the so call wide band lambda sensor also called “the 5 wires sensor”, which is the newest and more accurate one. The wide band lambda sensor is the most common one in the new vehicles equipped with two lambda sensors per catalytic converter.


How does a lambda sensor work?
The lambda sensor is used to regulate the fuel mixture, with the ECU responding to measurements from the sensor to determine the amount of fuel needed. This means the fuel mixture will be constantly fluctuating between rich to lean, allowing the catalytic converter to operate at peak efficiency, while balancing the overall mixture to minimize emissions.
If the ECU does not receive any measurements from the sensor, for example when the engine has just started or the sensor isn’t working, the ECU will use a fixed rich fuel mixture, which increases fuel consumption and emissions. If the lambda sensor or the wires are damaged or worn, the vehicle will be circulationg in rich mixture constantly, increasing fuel consuption and putting in risk other elements of the emission control system as catalytic converters.
When should you check your lambda sensors?
A typical lambda sensor has a long lifespan, but it can still fail. If you notice any of the following symptoms, it might be a good idea to check your lambda sensor:
- Irregular throttle in iddle
- Rough sounds coming from the engine
- High fuel consumption and poor performance
- Emission test failure
- Black smoke and carbon around the exhaust pipe
- Lambda sensors can fail for a number of reasons, including:
- Use of sealing paset containing silicone on the exhaust connections upstream lambda sensors
- Contaminated fuel or additives containing lead
- An engine that has started to burn oil, leaving carbon deposits on the sensor
- External contamination, such as road salt, undercoating material or chemicals
- Sensor has reached the end of its service life span
How to check a zirconium oxide lambda sensor
To check the lambda sensor, check the tension at the signal wire (in general black color). Usually, after the engine is warm and under normal operation the measurement should alternative between 0.1 and 0.9 volts around two times per second at 2000rpms.
If the lambda sensor is heated (three or four wires), take the heater and measure its resistance using an Ohmmeter. The heater is two wires of the same colour, usually white or black. It’s recommended to always check the car’s circuit diagram and to take the measurement at the engine’s normal operating temperature.
How to check a Titanium lambda sensor (easy to detect because the trheat diameter is smaller than the zirconium oxide and always present a yellow and an red wire.)
The measured tension at the signal wire is similar to the tension obtained from a Zirconium lambda sensor. A low tension value corresponds to a lean mixture, while a high tension (around 1 Volt.) corresponds to a rich mixture. In some ECUs it is the other way around, according to their internal connection
How to diagnose a wide band lambda sensor:
For the diagnosys of the wide band lambda sensors the use of a scan tool or oscilloscope is needed.
How to remove and replace a lambda sensor
Use a specialized socket to facilitate the removal of the lambda sensor. Check for the right application at the catalogue, similar applications may have different reaction time, not being equivalents. Use grease around the thread on the new sensor to make it easier to install the sensor now and remove it again at a later date. The sensor can be threaded into place by hand and tightened with the special socket to its right torque specified at the service manual of the vehicle.
Watch more with Garage Gurus
Take a step closer to the action, and watch a Garage Gurus expert show you exactly how to check, remove and replace a lambda sensor.
For informational purposes only. We are not liable for any damages resulting from your reliance on this content.


